Search This Blog

Monday, 19 March 2012

Lip Stains

Lip stains have had a bad rep for drying out the lips but the products nowadays finally don't shrivel up the lips to look like a mummy!  To have your lip color last all day (especially for weddings), try these guys out!

If you're a beginner, the Fresh Sugar tinted lip treatment is awesome - it goes on like a lip balm and is pretty sheer so it's really hard to screw up.  It has SPF 15 too!  Makeup artists can also easily scrape some product off onto their palettes so it doesn't cross contaminate and it's easy to apply.


If you're an intermediate, try the Urban Decay Super-Saturated High Gloss Lip Color.  I love most things made by Urban Decay because they have such a strong staying power - a must for weddings.  I just wish they had these in a more nude/neutral color instead of the pink tones.  You'll need a fat sharpener to sharpen this pencil...


Bride-to-be's should definitely pick one of these stains up.  First put your stain on, then a lipstick, then a gloss.  You won't have to worry about your lip color disappearing throughout the day to a deathly pale color because you'll always have something underneath it all.  The only thing that will destroy the stain on your lips are oily foods so plan to avoid oily foods at least till after your wedding pictures!

Thursday, 26 January 2012

Moulin Rouge Themed Event at the Shaw Conference Centre

Over the weekend, I was lucky enough to experience something other than my usual wedding/beauty makeup!


My makeup artist friend, Ella from beautybyella.com, referred me to an actor friend of hers.  He was participating in a very extravagent event at the Shaw Conference Centre on Saturday, January 21st, 2012.
I got a hold of the event coordinator, Barbara Day, and she said she was looking for a makeup artist that could paint 3 guys into "horses".

Uhhh...wha...


Yep...one white horse, one black horse, and a zebra. 
With the advice from Ella, I used Kryolan Aquacolors in white and black to paint their upper body and faces with some synthetic paint brushes that I bought from Michael's craft store.  It covered their bodies pretty fast, and the faint streaks left from the brushes gave an illusion of "horse hairs".


Then, I airbrushed any remaining splotchy areas with Createx airbrush paints.  I didn't paint under their armpits because...well...who would want their pits painted with the brush and then brush the paint all over their face!  Yummy!  So I airbrushed areas like that.  These products were water-based/water soluable so it was easy to scrub off in the shower.


With the zebra (1.5hrs), I used the MAC Pro Acrylic black paint because the Kryolan water based black would mix with the white so I had to use a different base.  Note to self:  If you ever use these paints, make sure you have some sort of oil based remover.  I had to ask the Shaw Conference for a bowl of canola oil to take off the stripes!  Poor zebra.


With the white horse (1hr), I airbrushed a brown color (Temptu foundation in S/B 007) to enhance the shadows that muscles would create...then went over it with a grey (black and white Createx) to enhance it even furthur.I tried to hollow out the cheeks and temples to imitate that of a horse.  When I was snapping picts, I told him to flex!  He was like "I don't have to flex much because I already look like I am!"  bahaha


With the black horse, I airbrushed the black Createx to enhance muscles... these guys were the sweetest student drama/theatre kids...It turned out pretty well for my first horse painting experience, I thought!


After 3.5 hours, they were ready for show time!  They strapped on their horse ears (actually bike helmets that were decorated by the creative, Barbara Day).  They pulled this Cinderella-like carriage with some dancers in it around the room.  It was so cool when it lit up!

Thursday, 1 December 2011

Best Eyeliner for the Waterline!

I have always had troubles finding an eyeliner that stayed on my waterline.  It would just melt away and disappear throughout the day.

I think everytime I have stepped into Sephora, I have bought a black pencil eyeliner to try and find the best eyeliner for my waterline.  I think I found something close to it....

Ta da!  Too Faced Perfect Eyes Waterproof and Tearproof Eyeliner!
I love this pencil.  I keep it for myself instead of in my kit (I know, I'm selfish).  The pencil runs at about $20 a pop at Sephora and it's worth every penny.  It's dark, pigmented, and glides on smoothly (like the Urban Decay 24/7) and it comes with a smudger hard foam tip at the back of the pencil!

The Process:  I have oily skin so I usually prime my eyelids and under my eyes with Urban Decay Potion Primer (original).  I try to prime the area closest to my upper and lower lash line...  I would line my waterline, then smudge it a bit with the smudger tip.  THEN, I would dust over the eyeliner with a matte black eyeshadow powder to set it even further.  As an extra step, I dab on a little of the Makeup Forever HD translucent powder under my eye to absorb any oil and brush excess powder away with a fluff brush.

My first impression was, "How the hell do I get this off?!?!".  The first time I tried it, I hopped into the shower and it didn't come off.  I was actually pretty freaked out and was wondering how the hell I was supposed to get it off since that's never been a problem for me.  Anyway, I used a little bit of olive oil on a Q-tip and took most of it off.

It's better than (takes a deep breath):
Revlon Colorstay (pretty good for a drugstore brand!!!  This irritated my eyes though...which is weird because I put everything on my waterline...it might be different for other people though? Updated: August 11/12)
Urban Decay 24/7 (really dark, but doesn't stay on)
Makeup Forever Aqua Eyes (not dark enough)
Stila Smudgestick Waterproof Eyeliner (smudges)
Buxom Insider Liner (not dark enough and it disappears fast)
MAC Smolder
Too Faced Lava Gloss Eyeliner (this is super dark, but omg, this smudges EVERYWHERE! The horror...)
Styli-Style (not bad for a drugstore eyeliner...stays on, but not dark enough)
Bourjois Smokey Eyes (stays on pretty good, but not dark enough)
Motives Eyeliner (pretty dark, and glides smoothly, but doesn't stay on)
Eveline Charles
Bonnebelle
Beautique from Sally Beauty (Updated: August 11/12)
Covergirl Perfect Point Plus

I'm sure I've owned other liners before...but clearly not worth mentioning if I don't remember them.  I've also tried gel liners before on my waterline like the Bobbi Brown gel liner and the MAC Fluidline gel liner and they were okay.  I still prefer the Too Faced Perfect Eyes on my waterline because I don't have to deal with brushing on the gel liner with a liner brush.  If I had to choose a gel liner to use, it would definitely be the Bobbi Brown over the MAC Fluidtrack (because the MAC Fluidtrack flakes off).  I find the Too Faced Perfect Eyes pencil a lot easier to glide on the waterline and it's darker.

The only complaint that I have about it (and this is more of a preference then anything), is that it's not in a retractable pencil form.  I'm lazy...I sometimes don't feel like sharpening my pencil and would rather twist up my eyeliner when it get's too low. 

Try it out!  Let us know if you have something better! :)

Tuesday, 11 October 2011

How to Prevent Eyeshadows from Creasing

Don't you hate it when it's the end of the day, your eyeshadows crease up?

I think one of the reasons why I've been a sucessful makeup artist is because I have very difficult skin.  My skin is oily so I constantly search for the next best thing to help keep my eyeshadows on.

The best eyeshadow primer that I've used handsdown is the Urban Decay Primer Potion!!!  It's so good that you can go party all night, (and if you fall asleep, face down in your pillow without suffocating), and although, your fake eyelashes might end up on your cheeks or stuck to the eyebrows...and lipstick smeared...you'll wake up with eyeshadows still looking perfect.

It is better than these other eye primers I've used:
Too Faced Shadow Insurance Primer
Smashbox Photofinish Lid Primer
MAC Paintpots or Prep & Prime products
Motives Eye Base
BeneFit Stay Don't Stray

Keep in mind, the primers listed above are specific for eyeshadows...not for your entire face. 

I've used both the purple bottle (original) and beige bottle (eden).  Thank GOD, they come in a squeeze tube now, because it was such a pain to dig stuff out from their former design (shaped like some sort of arabic bottle).  A lot of product got wasted because I couldn't get to the curvy parts of the bottle with the stick straight wand. 

 (booooo.. for odd shaped bottle)

I personally like the Urban Decay Primer Potion in Original because it goes on fairly clear.  It's pretty good on most skin colors!  However, with the Urban Decay Primer Potion in Eden, it would come out like a creamy, matte, MAC NC15 colored, concealer so it didn't work on all skin colors. 


I would definitely recommend picking up a squeeze bottle of the Urban Decay Potion Primer in Original.  It will prevent your eyeshadows from creasing and it will change your life!!

Friday, 7 October 2011

Boudoir Events Coming Up

Our artists are doing some hair and makeup for some up coming boudoir marathons...so we're pimping out some names:


October 22nd - Diane Herron Photography (see above)


November 5th - Boldy Beautiful Boudoir hosted by Vibe Photography and Perpetual Bliss Photography (see above flyer)

November 18th, 19th, and 20th - Amanda Diaz Photography

January 15th - Just For You Photography

You should definitely think about doing a boudoir shoot!  Do it for your partner (e.g. Christmas, Valentines, or Birthday gift) or do it for yourself.  I find as I get older and I look back at my younger days, I think...dayyaaamm...time flies by (as I stare at my brand new silver hair and tiny wrinkles)...It only goes down hill from here....lol.  Don't waste time and boudoir shoot now!

Monday, 3 October 2011

Western Canada Fashion Week - Runway for Temna Fialka

This past week was Edmonton's Western Canada Fashion Week (WCFW).  WCFW showcases all of the local talent - fashion designers, hairstylists, and makeup artists! 

We were able to join Temna Fialka's runway show again, and in addition to other talented makeup artists, we finished her models up for her KROV 2011 Collection at the Transalta Barns.  The Fall 2011 runway makeup looks featured a darker feel - "runway gothic".  Still beautiful but strong.

Natasha Lazorovic, designer for Temna Fialka, had a different twist to her usual collection this season.  Usually she would be showcasing recycled ethical furs (collected from farmers who would have to shoot at foxes, coyotes, ferrets, and put down cows!...etc), feathers, and leathers - but this season she found small flower patterened material to highlight head pieces that she borrowed from the Ukrainian Museum.  These head pieces were 50-100 yrs old!!!


We had a mini photoshoot in the alley just before the runway!


Schmoozing with the crowd after the runway! (left - Model Eileen Rokis - MUA Ashly McKessock) (right - Model Julia Sutygina - MUA Lydia Yapp)

Monday, 26 September 2011

Creative Body Art Shoot in a Mosquito Infested Forest

I was itching to do body art for a very long time.  Finally, I kicked myself in the butt and got to collaborate with some awesome photogs and model.  Nicole and her husband, Shawn, from NC Photography as well as the stunning miss Brookelynn (who use to be Miss International...or Miss Universe Canada or something like that....my old brain ain't working but she was stunning nonetheless!) were awesome people to work with!

I worked with the Makeup Forever Flash Palette, which is oil-based so it was awesome to use for blending!  Unfortunately, it was really easy to smudge.  I tried airbrushing on some Temptu shimmer, which is an alcohol based formula for longer waterproof wear, to try and encase the oil based stuff in.  I also powdered over everything with a bit of shimmer powder as well.  A makeup artist from L.A. once told me that a light mist of hairspray works too!

I drew my outline in a white pencil first so if I made any mistakes, I could easily smudge it off.  Then, I used a big synthetic foundation brush to fill in most of the color (i.e. the tree, the sun...).  I used a synthetic concealer brush to draw the flowers and the more detailed stuff like like lines in the tree, the leaves, and details on the flowers (magenta petals, coral medium transition, and yellow pollen). After drawing the details, I shaded in the shadows to make it pop more.  I liked using the synthetic brushes more for the creamy MUFE Flash Palette because it gave me more control.

4 hours later....I had drawn a shiny golden sun on her face, with sun rays beaming down, and a big ol' tree with flowers and leaves blowing in the wind.  The photographer met us and she made a comment how the sun was so shiny (it was a shimmer gold color in the palette) and how the rest of the artwork was matte.  She was worried how it was going to photography.

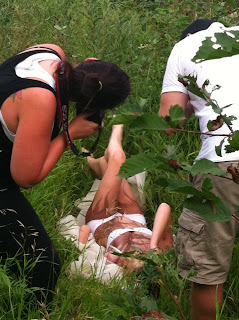
Too late now!  We drive off to a hiking trail near by and it is just infested with mosquitos!  Here are a couple shots of the photographer adjusting the hair off of the model's face and fixing the hair.


Check out these rockstar photographers!


The model was amazing too - totally unfazed by the millions of mosquitos trying to drink her blood.


Props to her boyfriend (now fiance - congrats you two!) doing some ninja photographing - can you see him?? (hint:  Up top left corner)


These pictures are why you NEED a professional photographer to do your portfolio work or on any special occasion!!  A professional model helps too!  She's so pretty!
 I forgot, I had added some clear gems to each blossom pollen for extra bling!  I also added some dramatic lashes and a couple of Shu Uemera colored individual lashes on the bottom corner of her lashes.  Hot pink lipstick just brings it all together :)

There was actually no wind that day so the model's boyfriend, Ryan actually gathered up the fabric in a little ball, then threw it up in the air!  Then he quickly jumped in the bushes to get out of the way so they didn't take him in the picture...lol.  It took a few times, but it turned out pretty cool :)  Shawn actually trekked across a creek in order to get this far away shot.

Looking at the finished product, everything seems so glamourous!  Little do people know the time, effort, and work everybody goes through to get a few good photos. 
I came out with 15 mosquito bites that day.  Dammit.
Feel free to comment or provide any feedback you might have!