Search This Blog

Monday, 26 September 2011

Creative Body Art Shoot in a Mosquito Infested Forest

I was itching to do body art for a very long time.  Finally, I kicked myself in the butt and got to collaborate with some awesome photogs and model.  Nicole and her husband, Shawn, from NC Photography as well as the stunning miss Brookelynn (who use to be Miss International...or Miss Universe Canada or something like that....my old brain ain't working but she was stunning nonetheless!) were awesome people to work with!

I worked with the Makeup Forever Flash Palette, which is oil-based so it was awesome to use for blending!  Unfortunately, it was really easy to smudge.  I tried airbrushing on some Temptu shimmer, which is an alcohol based formula for longer waterproof wear, to try and encase the oil based stuff in.  I also powdered over everything with a bit of shimmer powder as well.  A makeup artist from L.A. once told me that a light mist of hairspray works too!

I drew my outline in a white pencil first so if I made any mistakes, I could easily smudge it off.  Then, I used a big synthetic foundation brush to fill in most of the color (i.e. the tree, the sun...).  I used a synthetic concealer brush to draw the flowers and the more detailed stuff like like lines in the tree, the leaves, and details on the flowers (magenta petals, coral medium transition, and yellow pollen). After drawing the details, I shaded in the shadows to make it pop more.  I liked using the synthetic brushes more for the creamy MUFE Flash Palette because it gave me more control.

4 hours later....I had drawn a shiny golden sun on her face, with sun rays beaming down, and a big ol' tree with flowers and leaves blowing in the wind.  The photographer met us and she made a comment how the sun was so shiny (it was a shimmer gold color in the palette) and how the rest of the artwork was matte.  She was worried how it was going to photography.

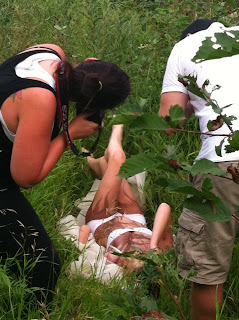
Too late now!  We drive off to a hiking trail near by and it is just infested with mosquitos!  Here are a couple shots of the photographer adjusting the hair off of the model's face and fixing the hair.


Check out these rockstar photographers!


The model was amazing too - totally unfazed by the millions of mosquitos trying to drink her blood.


Props to her boyfriend (now fiance - congrats you two!) doing some ninja photographing - can you see him?? (hint:  Up top left corner)


These pictures are why you NEED a professional photographer to do your portfolio work or on any special occasion!!  A professional model helps too!  She's so pretty!
 I forgot, I had added some clear gems to each blossom pollen for extra bling!  I also added some dramatic lashes and a couple of Shu Uemera colored individual lashes on the bottom corner of her lashes.  Hot pink lipstick just brings it all together :)

There was actually no wind that day so the model's boyfriend, Ryan actually gathered up the fabric in a little ball, then threw it up in the air!  Then he quickly jumped in the bushes to get out of the way so they didn't take him in the picture...lol.  It took a few times, but it turned out pretty cool :)  Shawn actually trekked across a creek in order to get this far away shot.

Looking at the finished product, everything seems so glamourous!  Little do people know the time, effort, and work everybody goes through to get a few good photos. 
I came out with 15 mosquito bites that day.  Dammit.
Feel free to comment or provide any feedback you might have!

Monday, 19 September 2011

Best Wedding Makeup Eyeshadows

I carry about 100 different eyeshadows (90) and pigments (10+) - both mainly from MAC Cosmetics and Motives Cosmetics.  Despite these many pretty colors...I tend to go back to certain colors all the time for wedding makeup.  These are the 15 MAC shadow pans, but I pried out the slot cover to fit in 22-23 shadows per pan.


Please note, if you have hooded lids or mature skin, do not use the shimmer colors for wedding photography makeup.  Other than that, contrary to what most people think, other eye shapes look amazing with shimmer inner corner, shimmer medium eyeshadows, and matte outer corners because it makes their eyes brighten up in photos!)

The ** beside the eyeshadow colors are colors that are essential colors required in everyone's makeup stash!

In my white/pink palette:
1)  **MAC White Frost (best shimmer for inner corner and brow highlight)
2)  **Motives Vanilla (a matte all over eyeshadow for yellow toned skin)
3)  **MAC Vanilla (a matte all over eyeshadow for pale skin)
4)  **MAC Dazzlelight (for a more subtle shimmer brow highlight)
5)  MAC Naked Lunch (more pinkier/peachy medium color)
6)  MAC Pink Freeze (best light pink shimmer for inner corner and sometimes on the lid)
7)  Motives Pink Gold (a pretty shimmer pink/gold medium color)


In my gold/brown palette:
1)  Motives Vintage Glam (a shimmer light gold color used near the inner corner, and on the bottom lashline for extra pretty eyes)
2)  Motives Gold Rush (people really like this gold shimmer look!)
3)  Motives Cappacino (a warm matte brown for just above the crease for an extra shadowy look)
4)  MAC Woodwinked (nice shimmer brown medium shadow color)
5)  Motives Toast (a neutral shimmer brown)
6)  **Motives Chocolight (a dark matte brown espresso type color for the outer corners)


In my purple palette:
1)  Motives Dollfaced (a very pretty shimmer light purple for middle shadow)
2)  Motives Shimmer Taupe (I thought this was the ugliest color in the world, but Stepanie uses this lots and it looks amazing in everyone's crease!)
3)  MAC Haux (romantic matte purple color)
4)  MAC Nocturnal (shimmer eggplant purple color - awesome on most skin tones!)
5)  MAC Fig 1. (matte eggplant purple color -very similar to Nocturnal)
6)  MAC Shadowy Lady (dark matte purple used on outer corner and sometimes the crease for smoky purple affect)
7)  **Motives Onyx (totally prefer this over my MAC Carbon for more color payoff -deep matte black for the outercorners or smokey eyes)
Booooo...One of my shadows broke (bottom right corner area)...What should I replace it with?

In my Grey/Green/Blue palette:
1)  Motives Stardust (a silver shimmer)
2)  Motives Gun Metal (a dark smokey shimmer grey)

I rarely use any of the green or blue shadows for weddings ^_^


What colors do you like for wedding makeup - eyeshadows?

Thursday, 8 September 2011

Tips for Makeup Artists - How to Save Time on Makeup Application Part 2!

Yikes, I haven't blogged for awhile...sorry!  The following are a few more tips on how to save time on your makeup application (continuation on the blog "Tips for Makeup Artists - How to Save Time on Makeup Application").  Some of these tips are probably a bit more useful for makeup artists...

1.  Skip the eyeliner and use dark eyelash glue on the band of the false eyelashes!  Sometimes, I don't bother with applying the gel liner or pencil liner when I know I'll be applying false eyelashes to someone.  The dark eyelash glue that I use (Duo Dark Tone) doubles up as a dark black eyeliner when applied.   As a time saving bonus - I don't have to put mascara on the top of the person's lashes since the false lashes are usually overpowering anyway (also lessens the risk of eyeliner/mascara smudging/running throughout the day). 


2.  Tear-off Paper Palette!  I learned this idea from Nicole Ziegler from Nicole Ziegler Make-up Design.  Instead of using my MAC metal palette and using a disposable anti-bacterial wipe to wipe and clean up the metal palette, I use these tear sheets that paint artists use for their acrylic paints.  These tear sheets are kind of like wax paper so it doesn't absorb any product.  After I finish with a client, I can tear one sheet off and chuck it into the garbage and immediately begins on squeezing out products for the next client!


3.  Powder brush!  A powder brush is a must have in everyone's makeup kit.  If I am in a hurry, I use the powder brush as a multi-purpose brush.  After finishing a persons eyemakeup, I use it to sweep away any shadows that fell onto the cheek.  After applying foundation and concealer, I use it to roll on some powder and brush off excess powder.  I also use it really quickly to apply powder blush on the cheeks and bronzer powder on the temples, hollows of the cheeks, and jawline.  It is faster than reaching for a disposable sponge, blush brush, and bronzer brush. 


4.  Carry disposables!  If you're a makeup artist, you probably already carry disposable mascara wands for your clients.  It is equally important to carry disposable lip brushes, disposable eyeliner brushes...etc!  I have had to use disposables when I had no time in between to clean my brushes for the next appointment (e.g. doing a 5 person wedding in the morning, and rushing to another 5 person wedding after that!).  Sometimes I wish I carried a little midget with me so he could clean my brushes in the car while we drive to the next appointment.  Disposables will save you time (especially when you have no time) and they're clean and sanitary to use on your client.  This has saved my butt a few times now.

5.  All-in-one primer, foundation, concealer, and powder!  This is one of my secret weapons introduced to me by one of my teachers a couple of years ago...The Motives Liquid Mineral Foundations.  It's a primer, foundation, concealer, and powder in one.  I go through tubes of the Linen (for caucasions like MAC NC15), Cream Beige (for Asians around MAC NC20), and Almond foundation colors (for tanned people or Indian skin around NC40).  It has a primer in the foundation already and dries so that you don't need to set it with powder.  It is creamy and thick enough to keep building and cover under eye circles and blemishes.  Although it is a product that is marketed like Avon, Mary Kay, and Amway...the foundation is actually really good and saves me time digging for my primers, concealers, and powders! If you're based in Edmonton, you can pick some up from SunDaze Tanning (which may run you about $25-$30 for a tube but is well worth it!).
Hope some of these tips and products were somewhat useful in helping save time on makeup applications!